Learn how to make crayons in molds using old broken crayons. See pictures, get tips and tricks, and find out all about how you can make fun recycled crayons.

What To Do with Broken Crayons
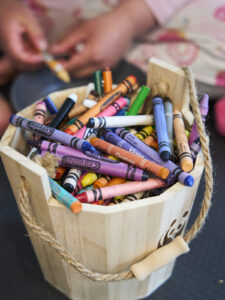
While spring cleaning with the kids, my preschooler cleaned out an entire bucket of crayons. She announced that she was done with these used and broken crayons and didn't want them in her room anymore.
Cleaning Tip: The kids love using this handy spring cleaning for kids chart!
So, what to do with an entire bucket of old and broken crayons? We didn't want to throw them away. In the end, we decided to upcycle the crayons into new recycled crayons to give to her friends.
Together, we're going to show you how to melt and make crayons in molds. It's a really simple process and both kids ended up helping.
Jump to:
- What To Do with Broken Crayons
- How to Make Crayons in Molds
- Supplies For Recycled Crayons
- How Do You Easily Remove Crayons from Paper Wrappers?
- How Do You Break Crayons Into Small Pieces
- Put Old Crayons in Silicone Molds to Melt
- How to Melt Crayons in the Oven
- How Long Does it Take For Recycled Crayons to Harden in Molds?
- How Do You Clean Silicone Molds for Melting Recycled Crayons
- What Brand of Crayons Melt Best In Molds?
- What Else To Do With Old Crayons
- How to Make Crayons in Molds Using Old Broken Crayons - Recycled Crayons

How to Make Crayons in Molds
It's easy to make crayons in molds. Here are the simple steps:
- Get your supplies ready
- Remove wrappers from the old or broken crayons
- Break the crayons into small pieces
- Fill a silicone mold with the broken crayon pieces
- Bake in the oven until the crayon pieces are completely melted
- Allow the crayon wax to cool
- Remove your new recycled crayons from the silicone mold

Supplies For Recycled Crayons
To make crayons in molds you only need a few supplies:
- Old or broken crayons - enough to fill your silicone molds
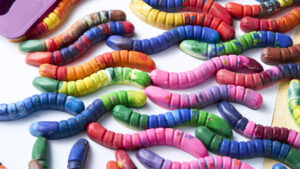
- A silicone mold suitable for crayons - she LOVES this worm mold, and it makes long pieces that are good for coloring
- Baking tray - to hold the silicone mold flat when transferring in and out of the oven
- Scissors, craft knife, or hammer - for removing the wrappers and for breaking the crayons into small pieces
Ready? Read on for tips that make this crayon craft fun to do with kids.

How Do You Easily Remove Crayons from Paper Wrappers?
While kids are always masters at removing the paper wrappers off crayons, there are a few hacks to make it quicker. You can see what works best for you, depending on the age of your child and how many crayon wrappers you need to remove for this craft.
Use a Craft Knife
To make our recycled crayons, I used a craft knife and made one long cut down the entire crayon, slicing through the paper. Next, the kids simply removed the wrapper.
The whole process took us about 10 minutes to cut and remove all the crayon wrappers. Both the four and eight year old helped.
Some of the papers stuck to the older crayons, probably because those crayons melted in bit in a backpack in the past. In the end, they weren't too difficult to peel off though.
Soak in Water
Soaking crayons in water is another method to easily remove the wrapper from crayons. Simply soak the crayons for about 10 minutes in a bucket of water. The papers will come off easily afterwards.
If you use this method, you'll need to dry the crayons off completely before filling them into the silicone molds.

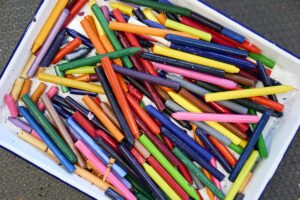
How Do You Break Crayons Into Small Pieces
Breaking crayons is super fun. After all, small kids seem to want to do it with new crayons all the time. Here's how we managed to break the entire bucket of crayons into small pieces.
Break with hands
The kids wanted to break the crayons, so that's what we did first. After we removed the wrappers, I let them break as many as they wanted.
If you use a big silicone mold, breaking the crayons by hand might be sufficient. Yet it didn't get the crayons small enough for the silicone worm molds we wanted to use.
Cut Crayons Into Small Pieces with Scissors
Consequently, after the kids broke as many crayons as they wanted to, I used craft scissors to cut the pieces into smaller chunks. It wasn't too hard, and it didn't take too long. The kids watched, so we were all entertained.
Smash Crayons with a Hammer to Break Them Into Pieces for Recycled Crayons
If you are looking for a hack, you can put the crayons into a ziplock bag and gently smash them with a hammer on a suitable surface.
This method will give you smaller crayon pieces than our photos. In addition, the pieces will be random sized.

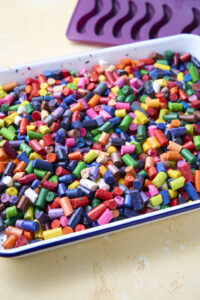
Put Old Crayons in Silicone Molds to Melt
Once you have your crayons broken into small pieces, it's time to fill the silicone molds.
How to Fill Silicone Molds to Make Recycled Crayons?
How you fill your silicone molds will depend on the shape and size of the mold you use to make your recycled crayons.
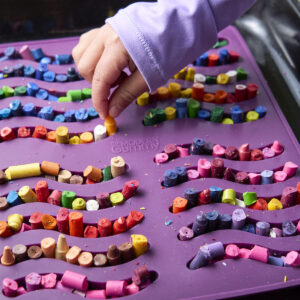
Fill Crayons Above the Molds To Make Full Shapes
For example, we used this fun worm mold, which is narrow and long. I found it best to stand up the crayons in the mold, so the worms would be as full as possible with wax. The crayon pieces stood taller than the edge of the worm mold, so the wax could drip down and fill in the gaps between the crayons.
Think About How To Mix Colors for Recycled Crayons
We made some single color worms, and we made some mixed color worms.
Try to put colors that would blend nicely together next to one another. For example, the kids thought the following:
- blue and red pieces = cool purple swirls when the crayons melt
- green and yellow pieces = looks like a field of grass
- red, orange and yellow pieces = looks like fire
- blues and white pieces = looks like the sky with clouds
- all shades of blue = looks like the ocean
How to Melt Crayons in the Oven
Melting crayons in the oven is super easy. You might be wondering, is it safe to bake crayons? Yes! Crayons are non-toxic so baking them will not be harmful. Keep in mind though that melted wax is very hot.
What Temperature Do Crayons Melt In Molds?
Melt crayons in the oven at 220°F. At higher temperatures, the color pigment starts to separate from the wax.
Technically, you can melt the crayons at higher temperatures. Indeed, some other recycled crayon recipes suggest using higher temperatures. However, melting crayons at higher temperatures often results in a whitish layer of wax floating on the top.
How Long Do Crayons Take To Melt in the Oven
At 220°F, it takes the crayon pieces about 20 minutes to fully melt. The exact timing will depend on various factors including if you preheat the oven, the size of the crayon pieces you use, and the size and shape of your silicone molds.
As soon as the crayon wax is fully melted, you can remove the tray from the oven. The best guide is to keep an eye on the crayon pieces and silicone mold while they in the oven.
Tip: As your crayon pieces start to melt and fill in the gaps in the silicone mold shapes, you might want to top up the molds with more small crayon pieces. Simply open the oven and add in small crayon pieces into the hot wax and allow the new pieces to fully melt.
Put Your Silicone Mold On a Baking Tray for Recycled Crayons
Don't forget to put your silicone mold on a baking tray so it's easy to transfer in and out of the oven. The silicone tray will be soft, and you won't be able to move it without a baking tray beneath it.
Also keep in mind that the wax will likely spill and drip out of the mold as the crayons melt and you move the tray around. A large tray will keep the wax from dripping to the bottom of the oven.

How Long Does it Take For Recycled Crayons to Harden in Molds?
Crayons take about 30 minutes to harden on the counter top. You can speed up the process by putting the entire tray in the refrigerator. Alternatively, during the winter, leave the tray outside in cold weather.
How Do You Clean Silicone Molds for Melting Recycled Crayons
Once you are done making the crayons, little flecks of wax might coat the silicone molds.
By holding my silicone mold over the garbage and shaking it around, most of the flecks knocked off. Next, I washed the silicone mold with warm water and soap.
The silicone mold gets completely clean with this method. However, we will likely keep this worm mold for crafts (DIY erasers, ice worms to play with, Play-Doh shapes) since we bought a set of two.
What Brand of Crayons Melt Best In Molds?
We used all sorts of crayons when we made the worms. We didn't notice any difference. Perhaps it's because we used low heat and small pieces of crayon.

What Else To Do With Old Crayons
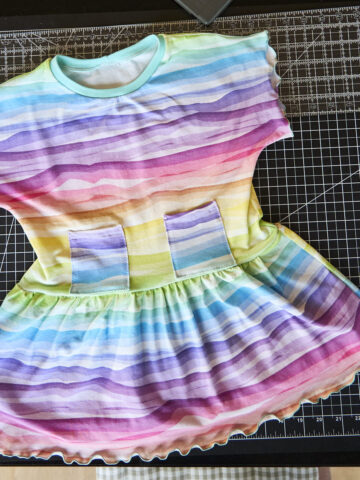
There are lots of other crafts to do with old crayons. Here's a super cute layered crayon candle. This melted crayon picture frame also looks fun to make.
Lastly, when you are all crafted out, the Crayon Initiative takes old crayons and makes them into new crayons for kids in hospitals.


How to Make Crayons in Molds Using Old Broken Crayons - Recycled Crayons
Equipment
- 1 silicon mold
- 1 baking tray
- 1 craft knife or scissor
Ingredients
- 75+ pieces old or broken crayons (you can use more or less crayons, depending on your silicone mold)
Instructions
- Get your supplies ready.

- Remove the wrappers from the old or broken crayons.

- Break the crayons into small pieces.

- Fill a silicone mold with the broken crayon pieces.

- Bake in the oven at 220°F for about 20 minutes, until all the crayon pieces are completely melted.
- Allow the crayon wax to cool completely in the silicone molds, about 30 minutes at room temperature.
- Remove your new recycled crayons from the silicone molds.


Beth says
I tried this with my child and it is very fun.
Tina says
Thank you for sharing! I'm so glad to hear!