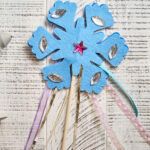
DIY Wand Craft
Make a DIY wand with these easy to follow instructions. This wand craft is fun and easy for kids to do. We used snowflakes, but other shapes work well too.
Yield: 1 wand
Equipment
- Scissors
Ingredients
- snowflake shapes
- wooden rods
- large gems
- assortment of ribbons - cut into 4-6 inch pieces
Instructions
- Use hot glue to glue the ribbons around the bottom of the snowflake, so they fan out a bit. TIP: Use the wooden rod to push the ribbon into the hot glue so you don't burn any fingers.
- Apply a line of hot glue down the length of the snowflake and glue on the rod.
- Apply a line of hot glue down the length of the rod where it overlaps the snowflake. Glue the second snowflake onto the rod, lining up the snowflake shapes.
- To fully sandwich the rod between the two snowflake shapes, apply hot glue between the two snowflake shapes to close it all together. Use hot glue around the edges of the snowflake petals and glue them together.
- Decorate your DIY wand with gems. Allow everything to dry and cool.
Notes
I made this wand with snowflake shapes, but you can also make this DIY wand using other shapes such as: