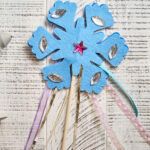
Make a DIY wand with these easy to follow instructions. This wand craft is fun and easy for kids to do. We used snowflakes, but other shapes work well too.

DIY Wand
My little crafter is at it again! Today, she wants to show how to make a DIY wand. She loved making this snowflake wand. In fact, she even made more of these wands with her friends at her crafting birthday party this year.
This snowflake wand pairs well with her DIY snowflake headband.
We used a snowflake shape, but it's easy to use any other shape you prefer for your DIY wand. Other fun ideas include hearts, stars or butterflies.
Supplies and Equipment for DIY Wand
- Hot glue gun
- Scissors
- Snowflake shapes
- Wooden rod
- Large gems
- Assortment of ribbons
What snowflake shapes to use?
The snowflakes we use in the photos are a seasonal product from Michaels. They are made of felt, and 6-inches in diameter. However, Michaels stopped selling the snowflakes shortly after Christmas.
This is the best one I can find on Amazon, and it's likely available year-round. Both felt shapes and foam shapes work great for wands.
What wooden rods to use?
When making wands, I use wooden rods that are 12-inches in length and either ⅛" or 3/16" in diameter. I find ⅛" diameter rods work great for little kids.
The wand in the photo uses a 3/16" diameter wooden rod. It makes a sturdier wand, but definitely not necessary.
What gems to use?
My kid loves using large acrylic flat back gems for crafts. For kids, I always try to buy gems that are about 1-inch large. The larger gems are easier for kids to handle, especially when hot glue guns are used. Plus, when larger gems spill, it's easier to pick up.
What ribbons to use?
Use an assortment of ribbons ranging from ⅛ to ⅜ inches. I also use ribbons in various materials. This is a perfect project to use up ribbon scraps.

How to Make This DIY Wand
This snowflake wand is very easy to make for kids. Here's my four-year-old making her wand. She wanted to show other kids how to make this DIY wand.
Glue ribbons onto the snowflake shapes
First, use a drop of hot glue and glue ribbons around the bottom of a snowflake, so they fan out a bit.
We cut the ribbons so they are about 4-6 inches in length. I let my kid do this by herself, so the length varied a bit. There's no need to be precise though.

TIP: Use the wooden rod to push down the ribbon into the hot glue.
My crafter asked me to emphasize this tip so kids don't burn their fingers. Squeeze a drop of hot glue on the snowflake. Then lightly rest the ribbon on top, being careful not to touch the hot melted glue. The most important tip is to use the wooden rod to push the ribbon into the glue.
You can see her doing it in the photo below.

Glue the rod down the middle of the snowflake
When you are done gluing on the ribbons, glue the rod straight down the middle of the snowflake. Apply the strip of hot glue down the entire length of the snowflake for a sturdy wand.

Glue the two snowflakes together
Once the rod is glued to one side of the snowflake, it's time to glue on the other snowflake.
To make the wand extra sturdy, apply a strip of hot glue along the top of the wooden rod and glue the second snowflake onto the rod, lining up the snowflake shapes.
Next, to fully sandwich the rod between the snowflake shapes, apply hot glue between the two snowflake shapes to close it all together. We used drops of hot glue around the edges of the snowflake petals.

Last, decorate the DIY wand with gems
The last step is super fun for kids. Let kids decorate the snowflake with lots of gems 💎

Enjoy making this DIY Wand
That's it! This DIY wand is super easy and fun to make. If you don't want the snowflake shape, you can swap it out for other shapes too. Here are a few other fun ideas:
- Yellow stars (it also comes in pink and various other colors)
- Hearts in white, red pink and purple
- Butterflies in various colors
More Snow Crafts and Activities
Love the snow like we do? Don't miss these other fun snow crafts and activities.
- Snow Day Bingo Activity
- DIY Snowflake Headband
- Winter All About Me - Printable
- Skiing with Kids - What you need to know
DIY Wand Craft
Equipment
- Scissors
Ingredients
- snowflake shapes
- wooden rods
- large gems
- assortment of ribbons - cut into 4-6 inch pieces
Instructions
- Use hot glue to glue the ribbons around the bottom of the snowflake, so they fan out a bit. TIP: Use the wooden rod to push the ribbon into the hot glue so you don't burn any fingers.
- Apply a line of hot glue down the length of the snowflake and glue on the rod.
- Apply a line of hot glue down the length of the rod where it overlaps the snowflake. Glue the second snowflake onto the rod, lining up the snowflake shapes.
- To fully sandwich the rod between the two snowflake shapes, apply hot glue between the two snowflake shapes to close it all together. Use hot glue around the edges of the snowflake petals and glue them together.
- Decorate your DIY wand with gems. Allow everything to dry and cool.
Notes


Leave a Reply