Our review of the Kids Be Invincible Skort sewing pattern - we love it! It's super cute, easy to make, and so much fun. Get tips and hacks.

Kids Be Invincible Skort Sewing Pattern Review
My daughter and I recently discovered the Be Invincible Skort sewing pattern, and we love it! I made two pairs for her this weekend, and she's begging me to make even more.
She'll probably spend the summer in the Be Invincible Skort this year. It is so cute, and she says they are incredibly comfy. I've been eying the adult version too, though I doubt I'd look as sweet as her in it. But she loves matching, so I might give it a try.
The Be Invincible Skort is from Ellie and Mac. It's not a new release pattern, but it's new to us, and we are so happy we discovered it. Hope this review of the Be Invincible Skort helps you if you are looking for a pattern to sew for kids.

Was the kids Be Invincible Skort pattern easy to use?
I'm pretty new to sewing, and I found the pattern very easy to use and follow.
No-trim style printed pattern
I printed the A4/Letter size pattern and taped it together. My 5-year-old always helps me assemble patterns, so it's a good task we can do together.
This PDF pattern uses the no-trim style, so it's quick and easy to assemble. The PDF also prints in layers, so you can easily chose which size to print. I always print 3 sizes - the size I intend to make, plus one size above and one size below.
Straightforward pictures and wording
The sewing directions are very easy to follow. The pictures are clear and helpful too.
Unlike some beginner specific patterns, the directions for the Be Invincible Skort is very straightforward and doesn't give extra guidance for sewing. For example, the directions don't tell you when you need to use a serger, zig zag stretch or regular stitch.
As long as you are comfortable using your sewing machine and working with fabric, the instructions will be easy to follow.

How We Tailored the Kids Be Invincible Skort Pattern
I think the Be Invincible Skort would work well if you followed the PDF pattern exactly. My daughter and I made a few adjustments to it though.
We Lengthened the shorts
First, we lengthened the shorts by 1 ½". I looked through all the photos on the product page, and it looked like the length hit differently on the various model photos. I figured it would be easier to shorten it later, so I added 1 ½" when I cut the pattern.
The extra length worked out perfectly. I imagine she would have found it a tad too short if I hadn't added the extra 1 ½".
She still sits in a 5-point harness in her car seat, and she doesn't like when the buckle touches her thighs. The extra length will also make playtime more comfortable. For example, she still likes to ride on those springy bouncers at playgrounds, and the extra length will prevent chafing.
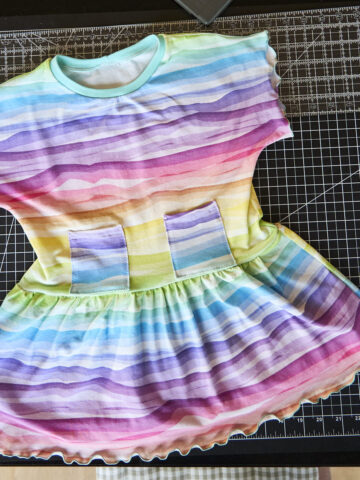
We used a lettuce edge rolled hem for the skirt
One of our favorite ways to finish edges on my daughter's clothes is to use a lettuce hem. It gives her skirt a more frilly look, which she absolutely loves! It's also easier for me to do because it's more forgiving than having to hem the skirt up evenly.
For one of the skirts, I used a metallic Woolly Nylon. I bought it used on eBay a while back and have been wanting to use it. It looked great with the black rose fabric.

We added a hidden patch pocket on the shorts
I always try to add pockets to any clothes I make for her. For this pattern, I tucked a patch pocket to the shorts. It's small, but just enough to carry whatever treasure (ie. rock) she might come across.
I skipped the basting stitch when attaching the skirt
The first time I made the skirt, I followed the directions and basted the skirt to the shorts before attaching the waistband. I used my sewing machine (as opposed to hand stitching), and had a hard time doing it. I struggled to get the raw edges to line up completely straight as I fed the stretchy jersey layers through my sewing machine.
The second time, I skipped the basting stitch all together. I used a lot of clips to hold the shorts, skirt and waistband together and serged it all together in one step.

How Kids Can Help Sew?
My daughter loves to get involved in making her clothes. She helped out with this in so many ways:
- Choosing Fabric - She picked the fabric. Both fabrics are from Frollein S, and we love the organic cotton collection they carry.
- Arranging Color Schemes - For the roses Be Invincible Skort, she designed the color scheme, down to the pockets and ribbing colors. She also picks the thread colors that I use.
- Taping - She helps tape together the printed sewing pattern. She's responsible for ripping the tape and sticking it on the pattern. I hold the paper pieces straight and steady.
- Clipping - She helps line up fabric edges and clips them together before I sew. As I sew, she also helps remove the clips as the clips approach the needles.
- Designing - She picked the location of the pockets that I added. She also asked for the lettuce hem edge for the skirt.
How She Wore the Be Invincible Skort
In the photos, we paired the Be Invincible Skort with this Free Key West Tank.
We made the Be Invincible Skort in size 5, and I had just enough fabric to squeeze in a size 5 Key West Tank on to the one yard of fabric we had. Even better, we used the scraps to make this super cute Kids Speedy Pants Underwear.
You might be able to tell in the photos, but for one of the tanks, we used a lettuce edge hem on the sleeves, instead of the arm binding.

We Love The Kids Be Invincible Skort Pattern
I hope this review of the Kids Be Invincible Skort Patter is helpful. My daughter really wanted to show off how flowy the skirt is in the the photos too. She loves it so much. Plus, it's super fun and so easy and quick to make.

L. Chan says
This is so fun!! She looks like she's having a blast in her awesome outfit!